Developing a Serverless Twitter Bot on Fission
Categories:
Social Media can be extremely overwhelming whilst being useful. Twitter of all is one of the most hyperactive social media platforms. If you are an enterprise, most likely you’ll have tons of tweets and DMs to reply to. While there are off the shelf tools available to help you do that, there’s always some missing functionality.
So why not develop a solution on your own? In today’ post I’ll show you how to develop a serverless Twitter Bot running on Fission. The simple application will show you how to use Twitter API and deploy the bot as a serverless function in Fission on your Kubernetes cluster.

Understanding Serverless The Twitter Bot
Before I take you through the code, let me help you understand what our serverless Twitter Bot will do. Below are a few pointers to help you understand the app and the use case better:
- Respond to any tweet that mentions you with a generic message
- Send a notification to Slack channel about the mention
- Will be deployed as Fission function
- Will execute at regular intervals using Fission’s Time Trigger
The serverless Twitter bot is developed in Python language and uses the following libraries:
- Tweepy - Twitter SDK in Python to interact with Twitter
- Slack SDK - Slack SDK in Python to send notification to Slack channel
Note: To ensure that our application doesn’t violate Twitter policy, we’ve restricted it to check for mentions made after our latest tweet. That way the bot will not respond to all the tweets where you were mentioned and spam the feed.
Pre Requisites
There are a couple things that need to be done before we start writing the code. We need to create a Twitter App, and a Slack App so that we can achieve what we want. Both the applications are free to create and you just need an account.
Fission
Before you start working on this demo, you need to ensure that you have Fission installed and running on your system. You can refer to our Fission Installation guide for more.
Creating a Twitter App
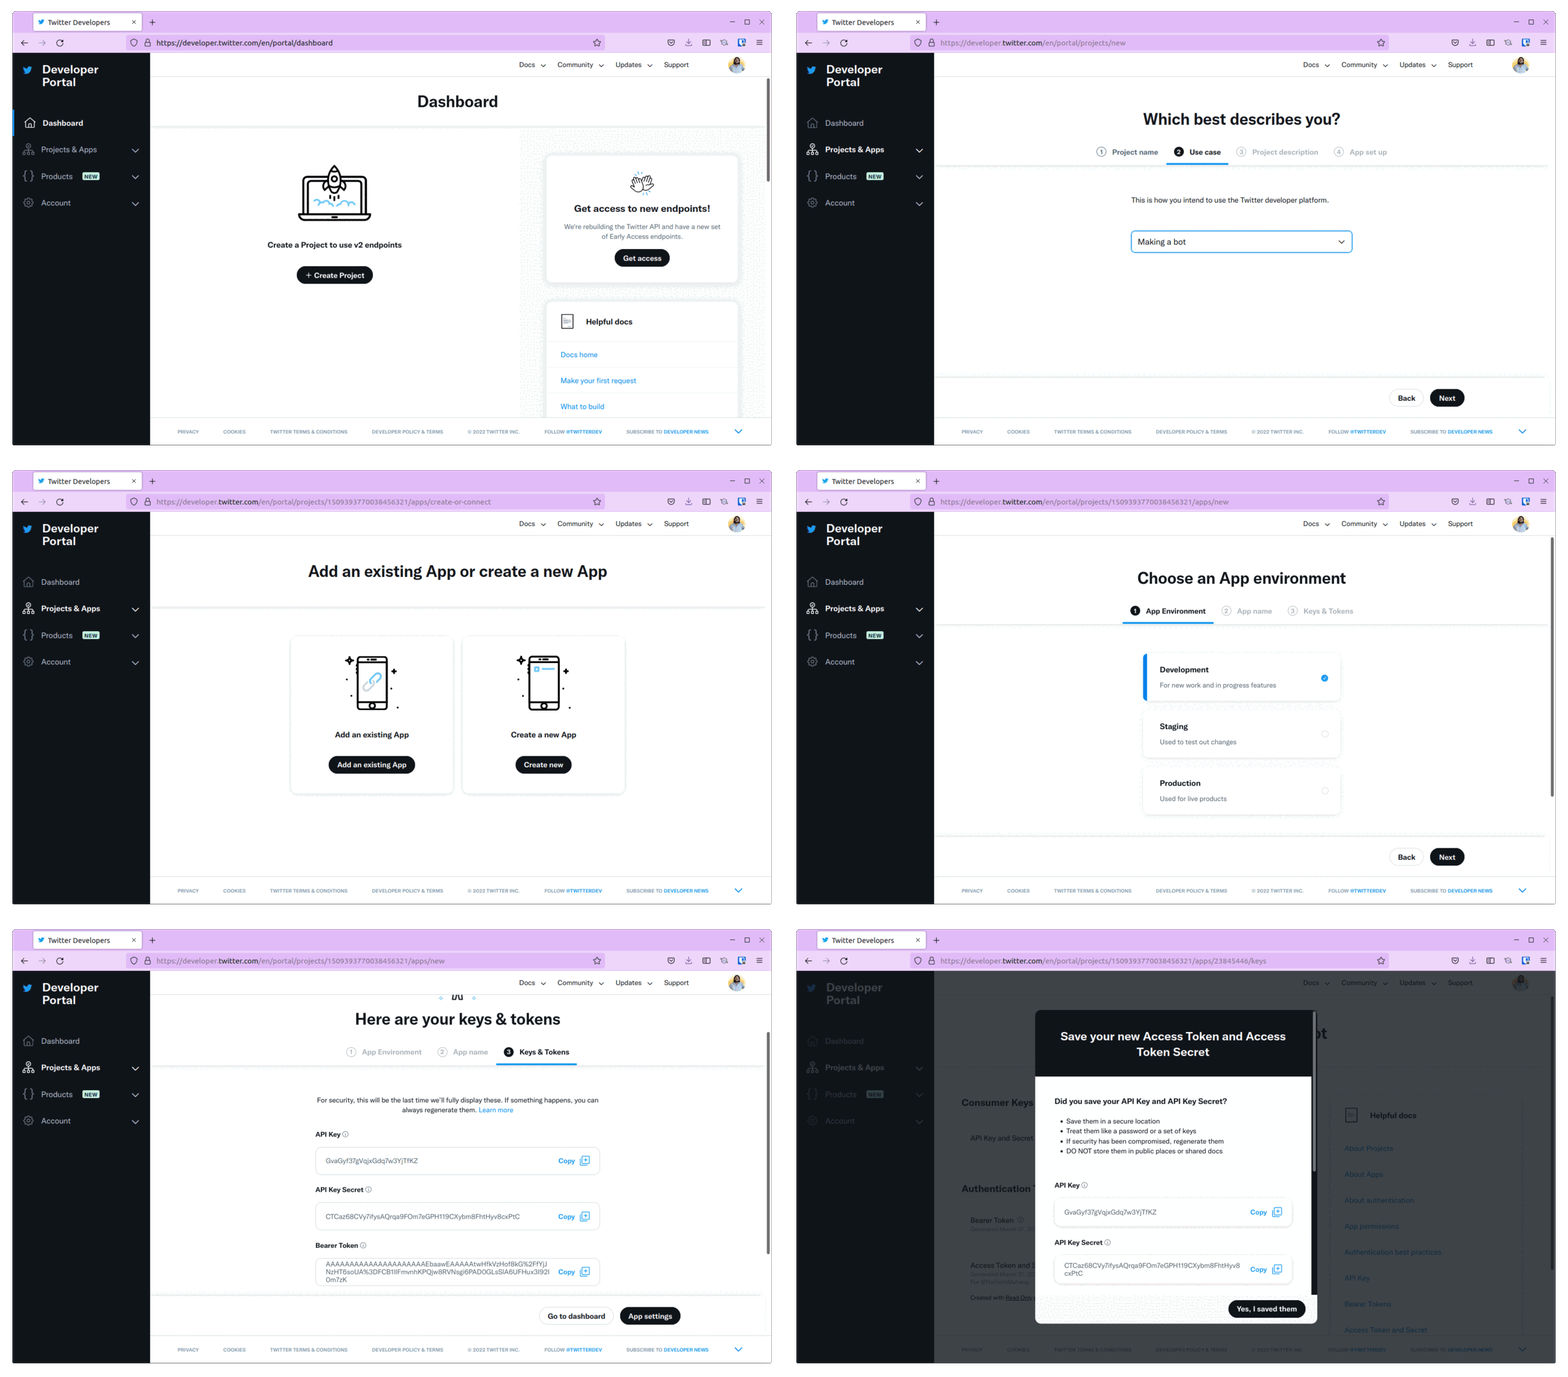
- Head to Twitter Developer portal, if you don’t have an account create one. (note that this will be the account on which our bot will run)
- Create a New Project and provide details like Project Name, Use Case and Project Description.
- On the next page, choose Create New App.
- Select App Environment as Development and provide an App Name.
- Save the API Keys and Secrets generated.
- From the Project Page, choose OAuth from User Authentication Settings.
- Turn on OAuth 1.0a option and choose Read and Write.
- Provide a random callback url and website url.
- Back on the Project Page, navigate to Keys and Tokens.
- Under Authentication Tokens, generate Access Token and Secret. Make sure it says “Created with Read and Write Permissions”

At this point, your Twitter App is ready to be used. Make sure to save consumer_key,consumer_secret,access_token,access_token_secret, we will need this later
Creating a Slack App
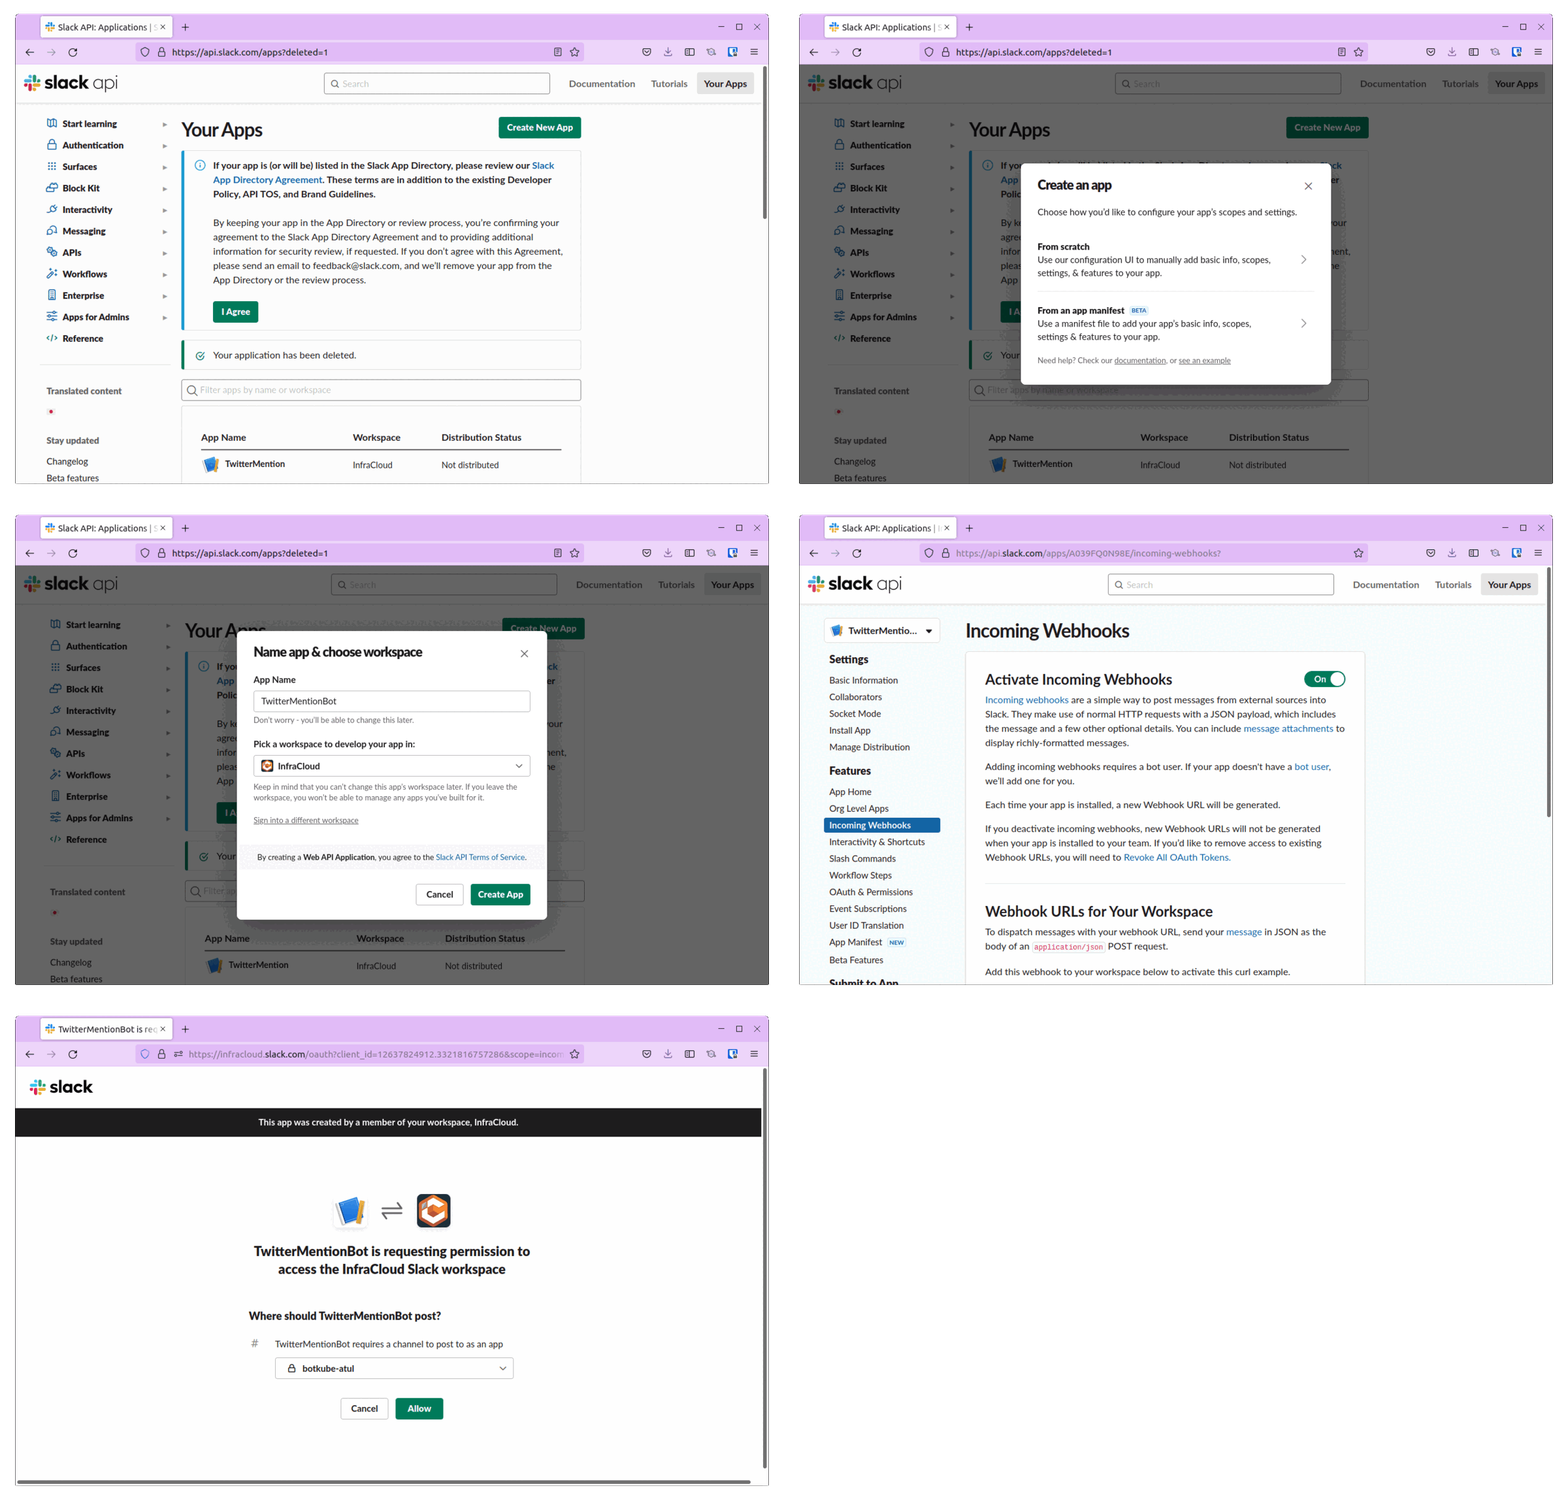
- Head to Slack API portal, if you don’t have an account create one.
- Click on Create A New App and create it from Scratch.
- Provide a unique App Name.
- Select a Slack Workspace - you should be a part of some workspace
- On the basic information page, select Incoming Webhooks and activate it.
- Click on Add New Webhook to workspace
- In a new window, select/enter a new channel name. This is the channel to which your slack app will send notifications.
- At this point, you’ll have the Slack webhook url with you.

We have successfully created a Twitter App and a Slack App. Let’s now create the application.
Creating Twitter Bot
You can clone the TwitterBot repository to create this application. Remember ot update the code with your tokens, keys and usernames.
app.py is the file which has the actual code. Make sure to update the username in app.py before running the script.
As we are using sensitive information like tokens and secrets, we will use Kubernetes Secrets to store these and access them in the code
consumer_key- Consumer Keyconsumer_secret- Consumer Secretaccess_token- OAuth Access Tokenaccess_token_secret- OAuth Access Token Secret
Start by encoding all the keys and secrets
echo -n 'actual-consumer-key' | base64
EncodedConsumerKey==

echo -n 'actual-consumer-secret' | base64
EncodedConsumerSecret==

echo -n 'actual-access-token' | base64
EncodedAccessToken==

echo -n 'actual-access-token-secret' | base64
EncodedAccessTokenSecret==
Create a new secrets.yaml file and add the encoded strings as data. We would be accessing these secrets from our code. Refer to our documentation on accessing secrets in Fission from code.
apiVersion: v1
kind: Secret
metadata:
  namespace: default
  name: twitter-secret
data:
  consumer_key: EncodedConsumerKey==
  consumer_secret:  EncodedConsumerSecret==
  access_token: EncodedAccessToken==
  access_token_secret:  EncodedAccessTokenSecret==
type: Opaque
Deploy the secret using kubectl apply -f secrets.yaml
Deploying Twitter Bot to Fission
Create a Python environment
fission environment create --name python --image fission/python-env --builder fission/python-builder:latest
Create a zip archive as sample.zip archive by executing package.sh script
./package.sh
Create a Package
fission package create --name fissiontwitter-pkg --sourcearchive sample.zip --env python --buildcmd "./build.sh"
Create the tweetbot fission function
fission fn create --name tweetbot --pkg fissiontwitter-pkg --entrypoint "app.main" --secret twitter-secret
Running the Serverless Twitter Bot
At this point, our bot is successfully deployed as a Fission function. To test this, you first need to send a tweet mentioning the user. Post that execute our tweetbot function
fission fn test --name tweetbot
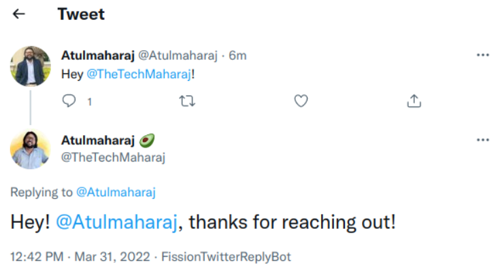
You should see that the bot has executed successfully by replying to the tweet and even sending a message in Slack.

Our Twitter Bot responding to a tweet mentioning the user

Notification in slack channel
Now to automate this, one of the easiest ways is to let the function execute at a pre-defined interval. This can be achieved using Fission Time trigger. Creating a time trigger will ensure that your function is called after a set interval.
Below is how you can create a time trigger to run the function after every minute.
fission timer create --name minute --function tweetbot --cron "@every 1m"
With this you have successfully developed a serverless Twitter bot that can respond to mentions. Anyone who mentions you in a tweet, the bot will automatically respond to it with the generic message and drop a notification in your Slack channel.
Conclusion
That’s about how you can create a serverless Twitter bot. This is useful whether you are an individual or an enterprise. You can very well modify the code to suit your requirements and extend the use case. Since this is running a serverless function on Fission, migrating it is easier. If you are still contemplating on why you should use Fission, you should read our post on reasons to choose Fission.
In case you still have any questions, feel free to reach out to us. We would be happy to help.
Want more?
More examples can be found in our examples directory on GitHub. Follow Fission on Twitter for more updates!
Author:
Atulpriya Sharma | Developer Advocate - InfraCloud Technologies